 Weight Tracker Documentation
Documentation and tips for setting up Weight Tracker on your WordPress site.
More:
Weight Tracker Plugin / GitHub / YeKen.uk
Gravity Forms
The following shortcode is only available in the Premium version of the plugin.
This shortcode can be used to display a progress bar indicating the current user's progress towards their target weight. Below is an example of the rendered shortcode:
How it works
Weight Tracker, can examine Gravity Form submissions for relevant Weight and custom field data. If valid data is found, a weight entry will automatically be created for the user currently logged in. This allows you to mix Weight Tracker fields amongst your Gravity Forms to provide a more tailored experience.
So, how does it work? If enabled, it examines every Gravity Form submission for fields that have certain CSS classes. If a field has one of the Weight Tracker classes, it is further examined and validated. If the data looks good as a whole, then a weight and custom field entry is added for the given date.
Enabling
By default, Weight Tracker will not process Gravity Forms. To enable this functionality, from your WP Dashboard navigate to Weight Tracker > Settings. From the tab “Integrations” ensure “Process Gravity Forms” is set to Yes. Then Save.
CSS classes
The table below illustrates the classes that can be added to Gravity Form fields. For the form to be processed, you must have a date and weight. Other fields are optional.
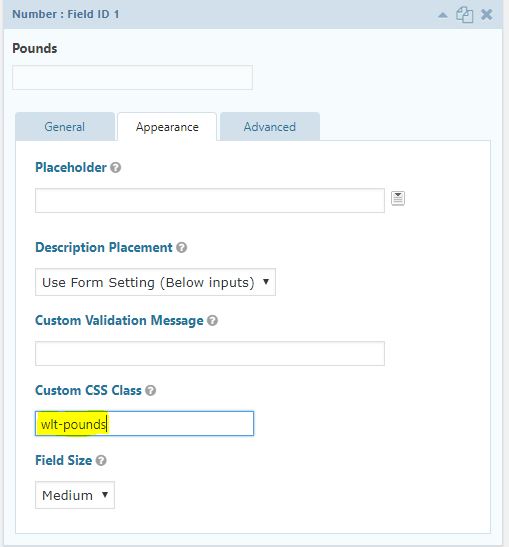
For example, say you wish to have a form with fields for Pounds, Date and Notes. Create a Gravity form with a numeric field and under the Appearance tab, add the CSS Class “wlt-pounds”. Next, add a date picker field and assign the CSS class “wlt-date”. Finally, add a text area for notes and add the CSS class wlt-notes.
When the form is submitted, if a numeric value has been entered for pounds (or other relevant weight fields) and a valid date specified then a Weight Entry will be added.
If other fields have a Weight Tracker CSS name and contain valid data, then their data will be attached to the new weight entry.
Mandatory Fields
| CSS class name | Mandatory | Related Weight Tracker field |
|---|---|---|
| wlt-date | Yes | Date |
| wlt-kg | Yes (or other weight field) | For Kg entry (other weight fields are not needed) |
| wlt-stones | Yes (or other weight field) | For Stones and Pounds (must be used alongside wlt-pounds) |
| wlt-pounds | Yes (or other weight field) | For Stones (wlt-stones must be used on same form) and Pounds or it can be used alone. |
Optional Fields
| CSS class name | Mandatory | Related Weight Tracker field |
|---|---|---|
| wlt-notes | No | Notes field |
| wlt-height | No | Height |
| wlt-meta-[meta key] | No | You can use this class name format to link Gravity Form fields to your Custom Fields. If you have a field key of "cups-of-water" for a given field, then the CSS class name you would specify on the GF field would be "wlt-meta-cups-of-water". Please note, for photo fields, you need the following Gravity Form plugin enabled: gravityforms.com/community/media-library/ |
Debugging
If you are finding that weight entries aren't being created, please turn on Gravity Forms debugging ( Forms > Settings > Logging ) and re-submit the form. Once submitted, refresh the settings page and click View Log. From here, you should see messages from the Weight Tracker plugin. Hopefully one of these messages will help you to understand why the weight entry was rejected.
Gravity form fields
The following JSON file is an example form that you can import into Gravity Forms. Simply save the file to your computer as example.json and use the Gravity Forms import tool to import it into it WordPress.